Wednesday, November 30, 2011

Recover Deleted Outlook Messages

I know it has been awhile since I posted so I thought I would post something quick. 

Have you ever accidentally deleted an Outlook message by using Shift-Delete (permanent deletion) or emptied your deleted items and realized that you permanently deleted a message that you want back?

Good news....

If you have Outlook 2010 click on the Folder Toolbar, then choose the Recover Deleted Items button.


A window will pop up with a list of recently deleted messages.  Find the message or messages and then click on the Recover Selected Items icon. 

If you have a previous Outlook version:

Click on the Tools toolbar and choose "Recover Deleted Items....".  Click a message you would like to recover and choose the "Recover Selected Items" icon. 

 If you do not see the item you deleted go to the folder you were in when you deleted the item and try again.

The item will be restored to the folder that you were in when you originally deleted it.

Happy Recovery!

Wednesday, September 28, 2011

MS Office (Format Painter)

One of the best Microsoft Tools for formatting is the "Format Painter".  Are you ever working in Excel or Word and you have formatted a line or cell and you have a line or cell somewhere else that you want to have the same formatting, but you don't want to do it manually?  EASY-PEASY!  Use the Format Painter.

Here is an example of how to use the Format Painter in Word.  Below is a sample Word document.  Notice that the 1st date contains formatting (bold and underline).

Now, I would like to take the same formatting from my 1st date and apply it to my 2nd date.  So, you will need to highlight the first date because this is the formatting you want to "steal".  You don't really have to highlight the whole thing, you could just highlight a letter or word, but I usually just highlight the whole thing.  Whatever you like.


Now, in your Home toolbar choose the Format Painter icon.  It is the one that looks like a  little paint brush.


The icon will change and now look selected.


Now, while the Format Painter icon is selected ("pushed in") highlight the 2nd date.


As you can see, my 2nd date is now bolded and underlined and I didn't have to do anything except apply the format painter.  Also, note that the format painter is no longer selected.


Now, let me show you how to apply the format painter in Excel.  It works the same way, but seeing a visual is so much better.  Also, make sure to read the extra helpful note near the bottom of my post because it is VERY helpful.

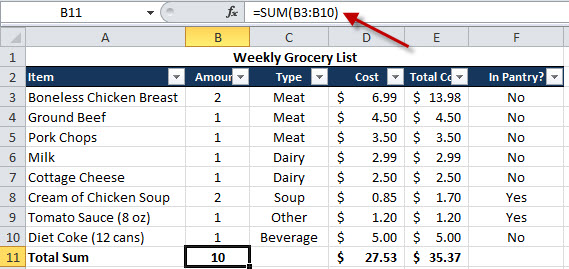
Here is my Excel Spreadsheet.  As you can see from column A there is a header row (row 1).  The first cell A1 is bold and underlined.  Then, there are a few cells that are highlighted in yellow. 


Now, pretend that you need to apply the same formatting to the other columns.  Don't do it manually!  Highlight the first column by taking your cursor, place it over column A (it will turn into a black down arrow), then click with your left mouse button to highlight the entire column.


Now, single click the format painter button.  Then, while the format painter button is still selected, highlight columns B and C.  You will now see that the formatting has now been added to the columns you highlighted while the format painter icon was selected.


Extra Helpful Note - did you know that if you double clicked the format painter it will remain selected until you select it again?  Why is this a great thing?  Because if you wanted to apply formatting to cells that were not side by side and you wouldn't be able to highlight them in a single click you can double-click the format painter and select one-by-one any cell that you would like to apply the formatting to.  Like I said, EASY PEASY!

When working in MS Word the format painter is wonderful when you need to apply formatting to a table or other pages.

Monday, September 26, 2011

Excel 2010 (Filtering data)

I work with spreadsheets all day at work.  I know and love Excel.  I would have to say that the "Auto-Filter" is one of my favorite Excel tools.  So, I am dedicating my first Excel post to Auto-Filters.

Why do I love auto-filters?  Because I can use them to filter data (duh!), sum only the data I want, find duplicates, subtotal my data, etc.  If this seems a little complicated, just stick with me.  You will love what you can do with a little bit of filtering and a few functions.

For this example, I'm going to use a grocery list as my sample data (the dollar amounts are just sample data and do not reflect the actual cost of the item).  The instructions below should work for Excel 2010 or 2007.

To turn on an auto-filter, highlight your data, making sure that the top of the data highlighted is your header row.  I highlight my data from the bottom to the top, but it doesn't really matter.  It is whatever your preference is.  See my highlighted data below.


Now that your data is highlighted, click on the Data toolbar and choose the "Filter" button.  Your data will now look like the picture below.  You will now have little down arrows next to your data.  This is an auto-filter.

Update:  If you do not have a Data toolbar, if you are on the Home toolbar you should have a little AZ icon (with a little funnel icon next to it) on the right side of the toolbar, click it and then choose Filter.


Now, if I want to see only the Dairy Items on my list.  I can click on the down arrow next to the Type column and it will give you a menu like the one below.  Deselect each option except for Dairy.  Then, click OK.


You will now see that your data is filtered.  You should now only see the items with Dairy as a Type.  Also, your icon next to "Type" has changed from a down arrow to a filter icon.  This is an indication that you have filtered that column.  Another indication is that your row numbers have now turned blue.


To unfilter just click on the "Clear" button next to the "Filter" button on your Data toolbar.

Now, let's say I have highlighted some information.  Excel has a new option to "Filter by Color".  I personally, LOVE this new option.  In this example I have highlighted anything that is over $3.  Now, let's say I want to filter on color.  Click the down-arrow next to any of the columns that contain highlighting (in this case it is any of the columns).  Then, choose Filter by Color and choose the Yellow color.


The Results would look like below.


Ok.  Now, I would like to show why I love to Filter when using the Subtotal function, but let me first show you the Sum function.  Most everyone that uses Excel is familiar with the Sum function.  I have added another row to sum up the total # of Items, the Cost and the Total Cost columns.  As you can see in the picture below (the arrow is pointing to the actual sum formula I'm using).


This Sum would not change even if I filtered my data.  This might be helpful depending on the circumstance, but I like to use the Subtotal function so if I filter my data the Subtotals chang based on what is filtered.  In the picture below I have added a new Subtotal row, just like Sum, but using the Subtotal function (the red arrow shows the actual function).


As you can see from my formula it has a number "9" included.  When using the subtotal function you have to specify what type of function you want the subtotal to perform.  In this case I'm using the Sum function which is number 9.


Ok, so I've added my Subtotal row and I've added the subtotal Sum function to cell B12 and I've added the subtotal Count function to F12 to tell me how many items I will be purchasing.  Then, I filtered on "In Pantry?" and selected "No" so I know which Items I need to purchase.


As you can see the "Total Sum" row which uses the normal sum still says 10, whereas the Subtotal Sum has changed to 7.  That is because the subtotal only sums those that have been filtered and the Sum function sums all.  Now, if you look at Cost and Total Cost you can see the difference based on the Sum and Subtotal function.  Then, for column F I used Count and Subtotal Count.  So, there are 8 total items in that column, but only 6 have been filtered.

Please let me know if you read my post and if you found it helpful.  Also, feel free to requests items you would like me to show you.  Have a great night!

Friday, September 23, 2011

Copying or Moving Pictures from your Camera Card

Below are the steps to copy or move pictures to your computer from your camera card.

1.  First, put your camera card into the slot in your laptop.

2.  Right-click the Start Menu  (you will see the menu below) and choose Open Windows Explorer.


3.  Once Windows Explorer opens you will see a window that looks similar to the one below.  In the left frame you will see DCIM, double-click on the folder.


4.  Now, you will see the window below.  You may see multiple folders depending on what your card has been used for (multiple cameras, scanner, etc).  Double-click on each one until you see your photos. 


5.  Now, you should see this window (below) with your pictures either listed as names or you may see them as mini-pictures.


6.  Now, go back to step one and right-click on your start menu again and choose Open Windows Explorer.  Do not close the window that you already have open with your pictures.  Once the 2nd window pops up try to move it to the side of the other window, like below.  You can grab a window and move it by touching the top bar of the window with your cursor and then by holding down your left mouse button drag it to where you want it.  The should be side to side.


7.  On the window on the right click browse to the folder where you would like your pictures to reside.  I suggest putting them into your My Documents Pictures folder.  Once you are in the correct folder click on the "New Folder" button (see red arrow below).  Name your folder a name that will be easy to remember based on the pictures that you are moving over.  For this example, I'm naming my folder "September 2011 Pictures".


8.  After you hit enter after naming the folder you will see it in the list of folders in the window on the right.

 9.  Now, double-click on it to open it.  It will look like the folder below.

10.  Now, with the window on the left.  Click on one of the pictures and then hold down Shift and the "A" key on your keyboard at the same time.  This will highlight all of the pictures on your card.  While they are still highlighted move your cursor so it is hovering over one of the pictures and RIGHT-click on it.  Choose Cut (Choose Copy if you want to leave the pictures on your camera card). 

11.  Move your cursor to the empty space in the right window (where you created your new folder for your pictures in step 7) and right-click the empty space.  Choose Paste.

12.  You will see a window like the one below:


13.  Now, your pictures have been successfully moved to your hard drive.  To remove the card from your machine, click on the little arrow next to the time on your start menu.  You will see the icon below.


14.  Right-click the icon and choose Eject.

You can now remove your card and place it back in your camera.

Next post....how to email pictures or upload them to facebook.

Blog Purpose

My husband and I both have "Tech Jobs".  Due to this we receive phone calls every now and then from our mom's asking us computer questions.  Also, family members that never call us will pick up the phone and call.  We know right away that it must be because they have a computer problem.  :o)  So, I've decided to start this blog so that when my mother or MIL has a question they can come and reference the answer here. 

So, Patte and Judy....this blogs for you.